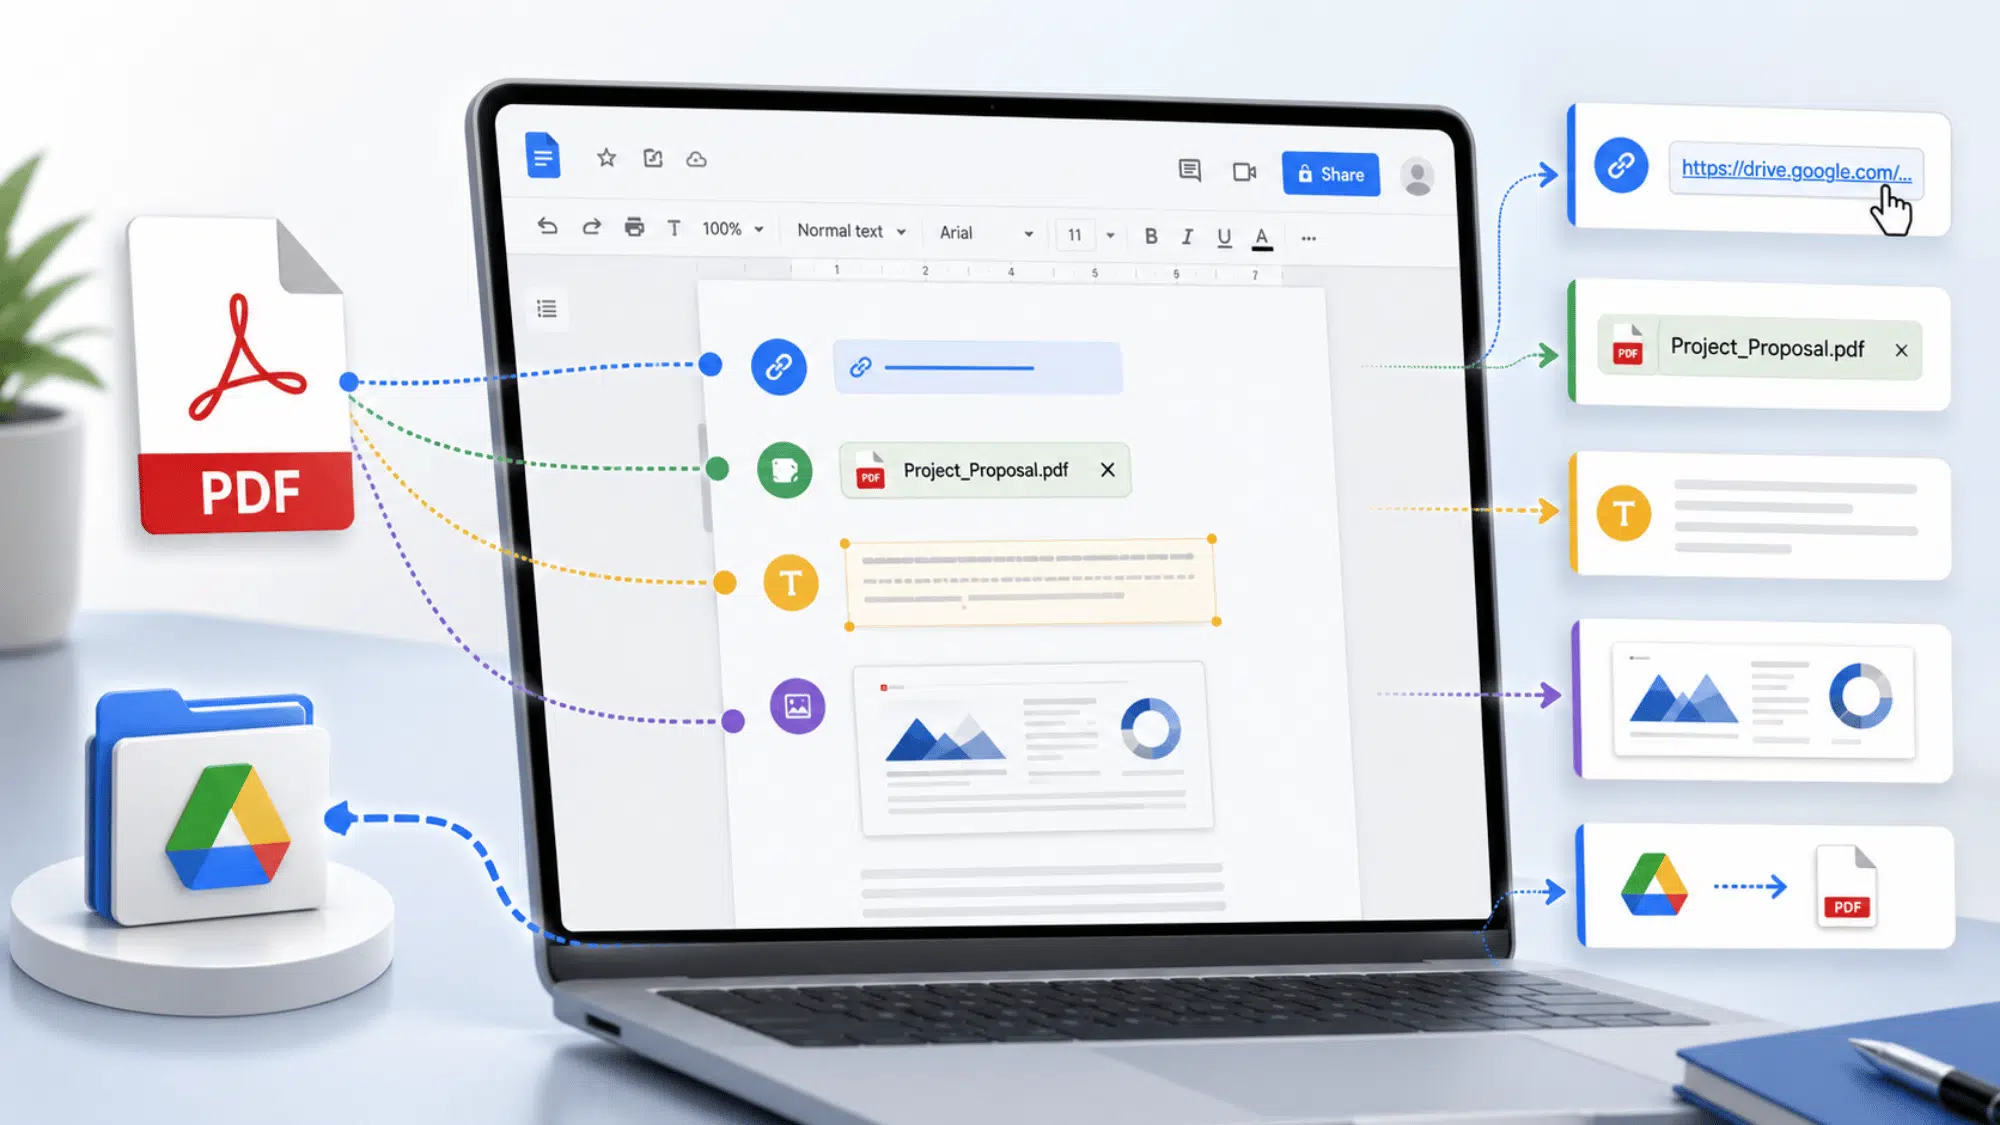



You try to drag a PDF into your Google Doc, and nothing happens. If that sounds familiar, you are not alone.
Google Docs does not support direct PDF embedding, which catches many people off guard the first time.
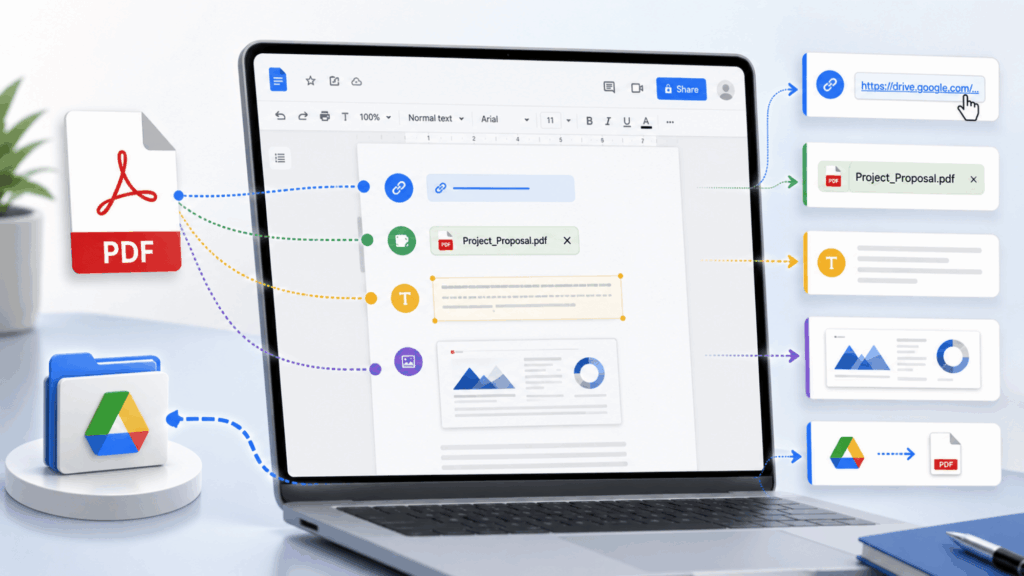
You can add a PDF to Google Docs as a clickable link, a smart chip, a set of images, or convert it into editable text using Google Drive.
Knowing which method to use saves real time. We walk you through each one step by step, so you can pick what works for your workflow and get it done in minutes.
Google Docs Cannot Embed PDFs: Here Is Why That Matters
Google Docs is a text editor at its core. It is built to create, format, and edit text, not to display external file formats inside its interface.
So when you try to drop a PDF into a Doc, and nothing happens, that is not a glitch. It is just how the product works.
Google intentionally keeps file storage and document editing separate. Drive holds your files; Docs handles the writing. The two work together, but they do not merge.
Once that clicks, the five methods for adding a PDF to Google Docs start to make a lot more sense.
All the Methods at a Glance
Before going step by step, here is a quick look at all methods and what each one is best for.
| Method | Best For | Keeps Formatting? | Editable After? |
|---|---|---|---|
| Insert as a Link | Sharing or referencing a PDF | Yes (PDF stays intact) | No |
| Smart Chip | Attaching a file inside the Doc body | Yes (PDF stays intact) | No |
| Convert to Google Doc | Editing PDF content inside Docs | Partially | Yes |
| Insert as Images | Preserving the PDF’s visual layout | Yes (visual only) | No |
| Copy and Paste Content | Quickly pulling text from a selectable PDF | Partially | Yes |
How to Open a PDF in Google Docs in Simple Methods
Use the method that matches your goal, from adding a simple link to turning PDF pages into editable content.
1. Insert a PDF as a Link
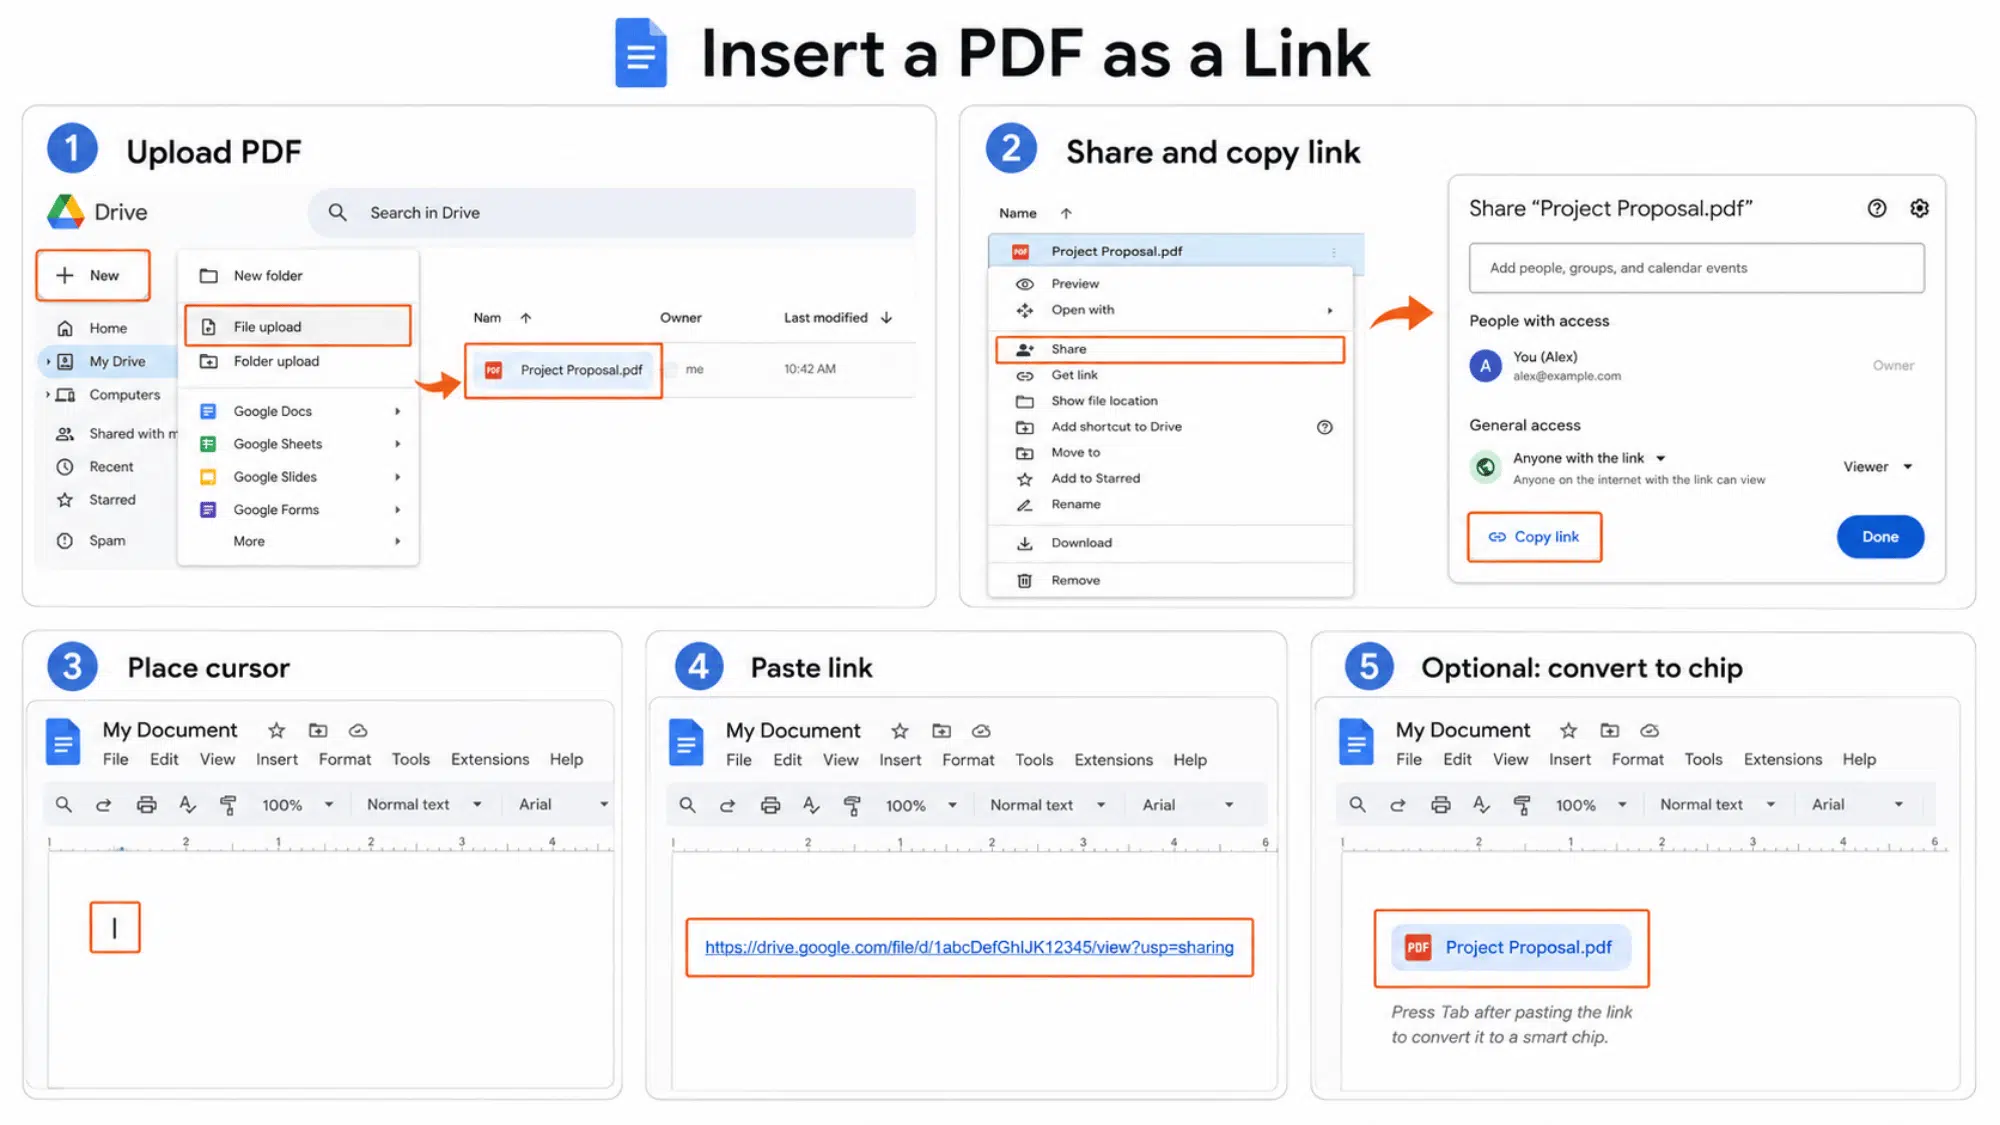
This is the simplest approach. The PDF lives in Google Drive, and you paste its link into your Doc. Anyone with access can click it and open the file.
- Go to Google Drive and upload your PDF by dragging it in or by using New > File Upload.
- Right-click the uploaded PDF and select Share. Set access to “Anyone with the link” or restrict it to specific people, then click Copy link.
- Open your Google Doc and place your cursor where the link should go.
- Press Ctrl+V (or Cmd+V on Mac) to paste the link.
- Optional: Press Tab immediately after pasting to convert the raw URL into a clean smart chip that displays the PDF’s filename instead of a long link.
Tip: If the PDF is confidential, double-check the sharing settings in Drive before copying the link. Set access to “Restricted” if you only want specific people to open it.
2. Attach a PDF Using a Smart Chip
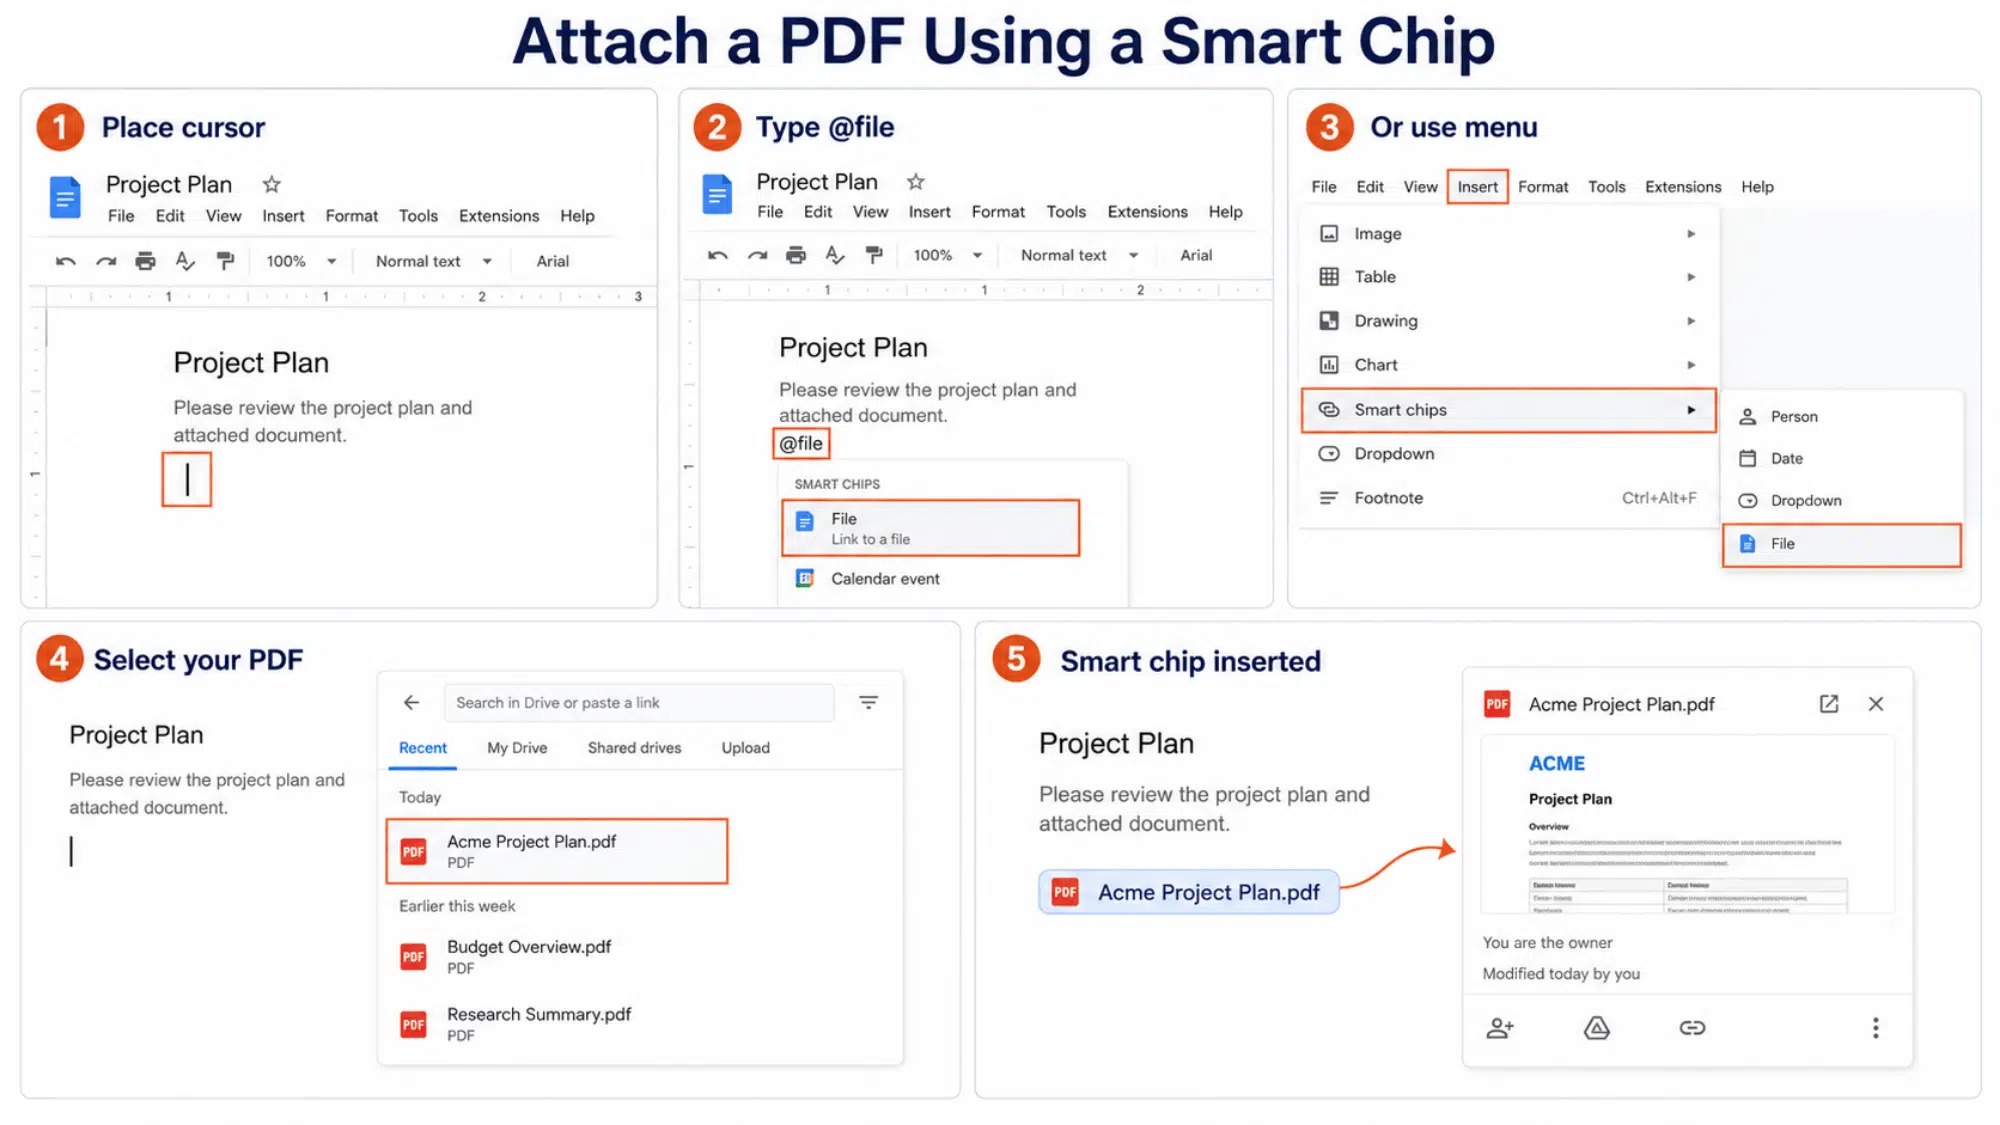
A smart chip embeds the PDF as a small, clickable file tag directly inside the body of your document. It looks cleaner than a plain URL and keeps the file close to the relevant text.
- Open your Google Doc and click where you want to place the chip.
- Type @file or go to the top menu: Insert > Smart chips > File.
- A dropdown will appear with recent Drive files. Search for your PDF by name if it does not show up immediately.
- Click the PDF to insert it as a chip. It will display the file name and a small icon.
Tip: The smart chip is different from a plain hyperlink. Hovering over a chip displays a file preview card with the file name, type, and last modified date, making it easier for collaborators to identify the file at a glance.
3. Convert a PDF to Google Docs Format
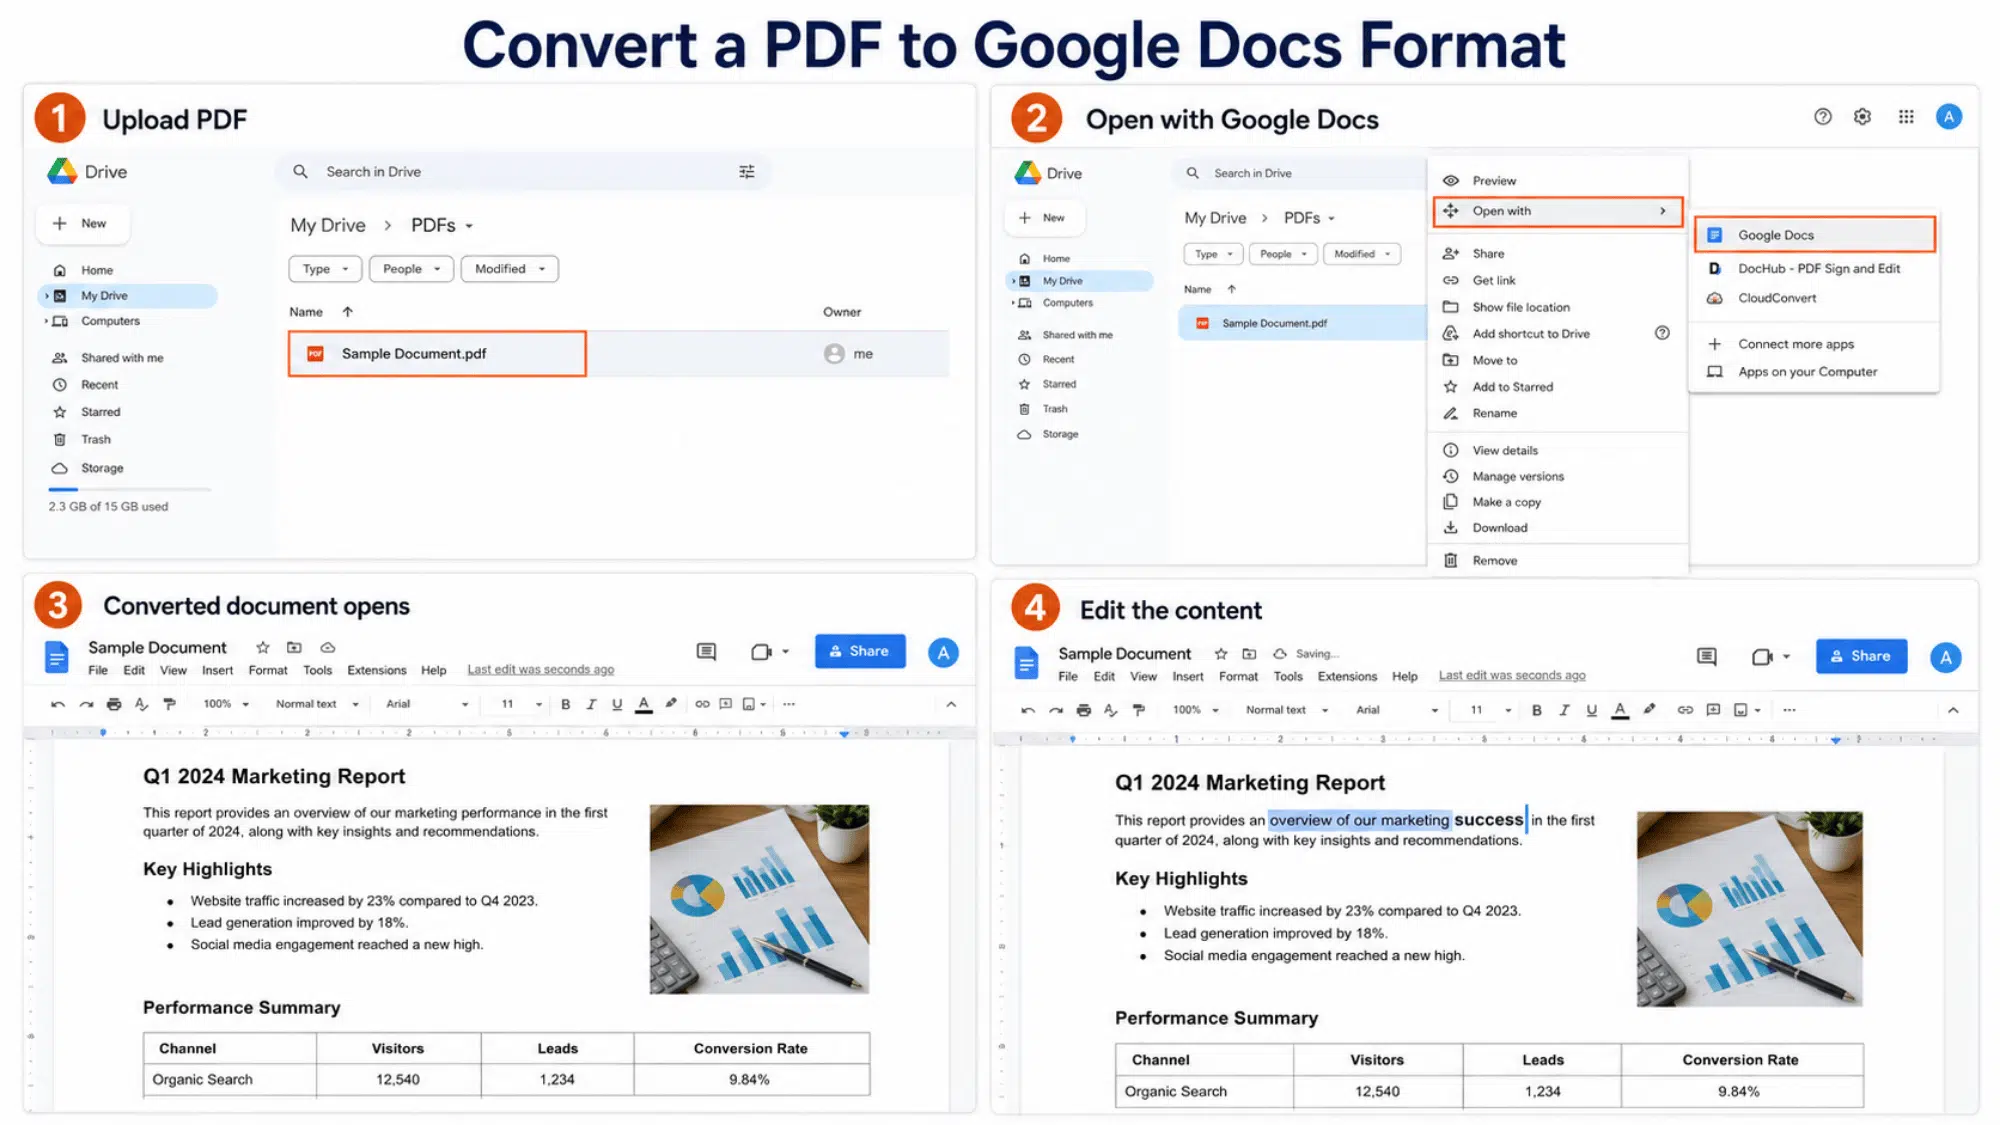
If you need to copy and edit the content of a PDF inside Google Docs, this is the method to use. Google Drive will extract the text and images from the PDF and open them as a new, editable Google Doc.
- Upload the PDF to Google Drive.
- Right-click the file, hover over Open with, and select Google Docs.
- A new Google Doc opens automatically with the extracted text and images from the PDF.
- Edit the content as needed, just as you would with any Google Doc.
Tip: For multi-page PDFs, all pages will be extracted into the same Google Doc. Scroll through the full document after conversion to spot any missing sections or formatting issues before editing.
4. Insert PDF Pages as Images
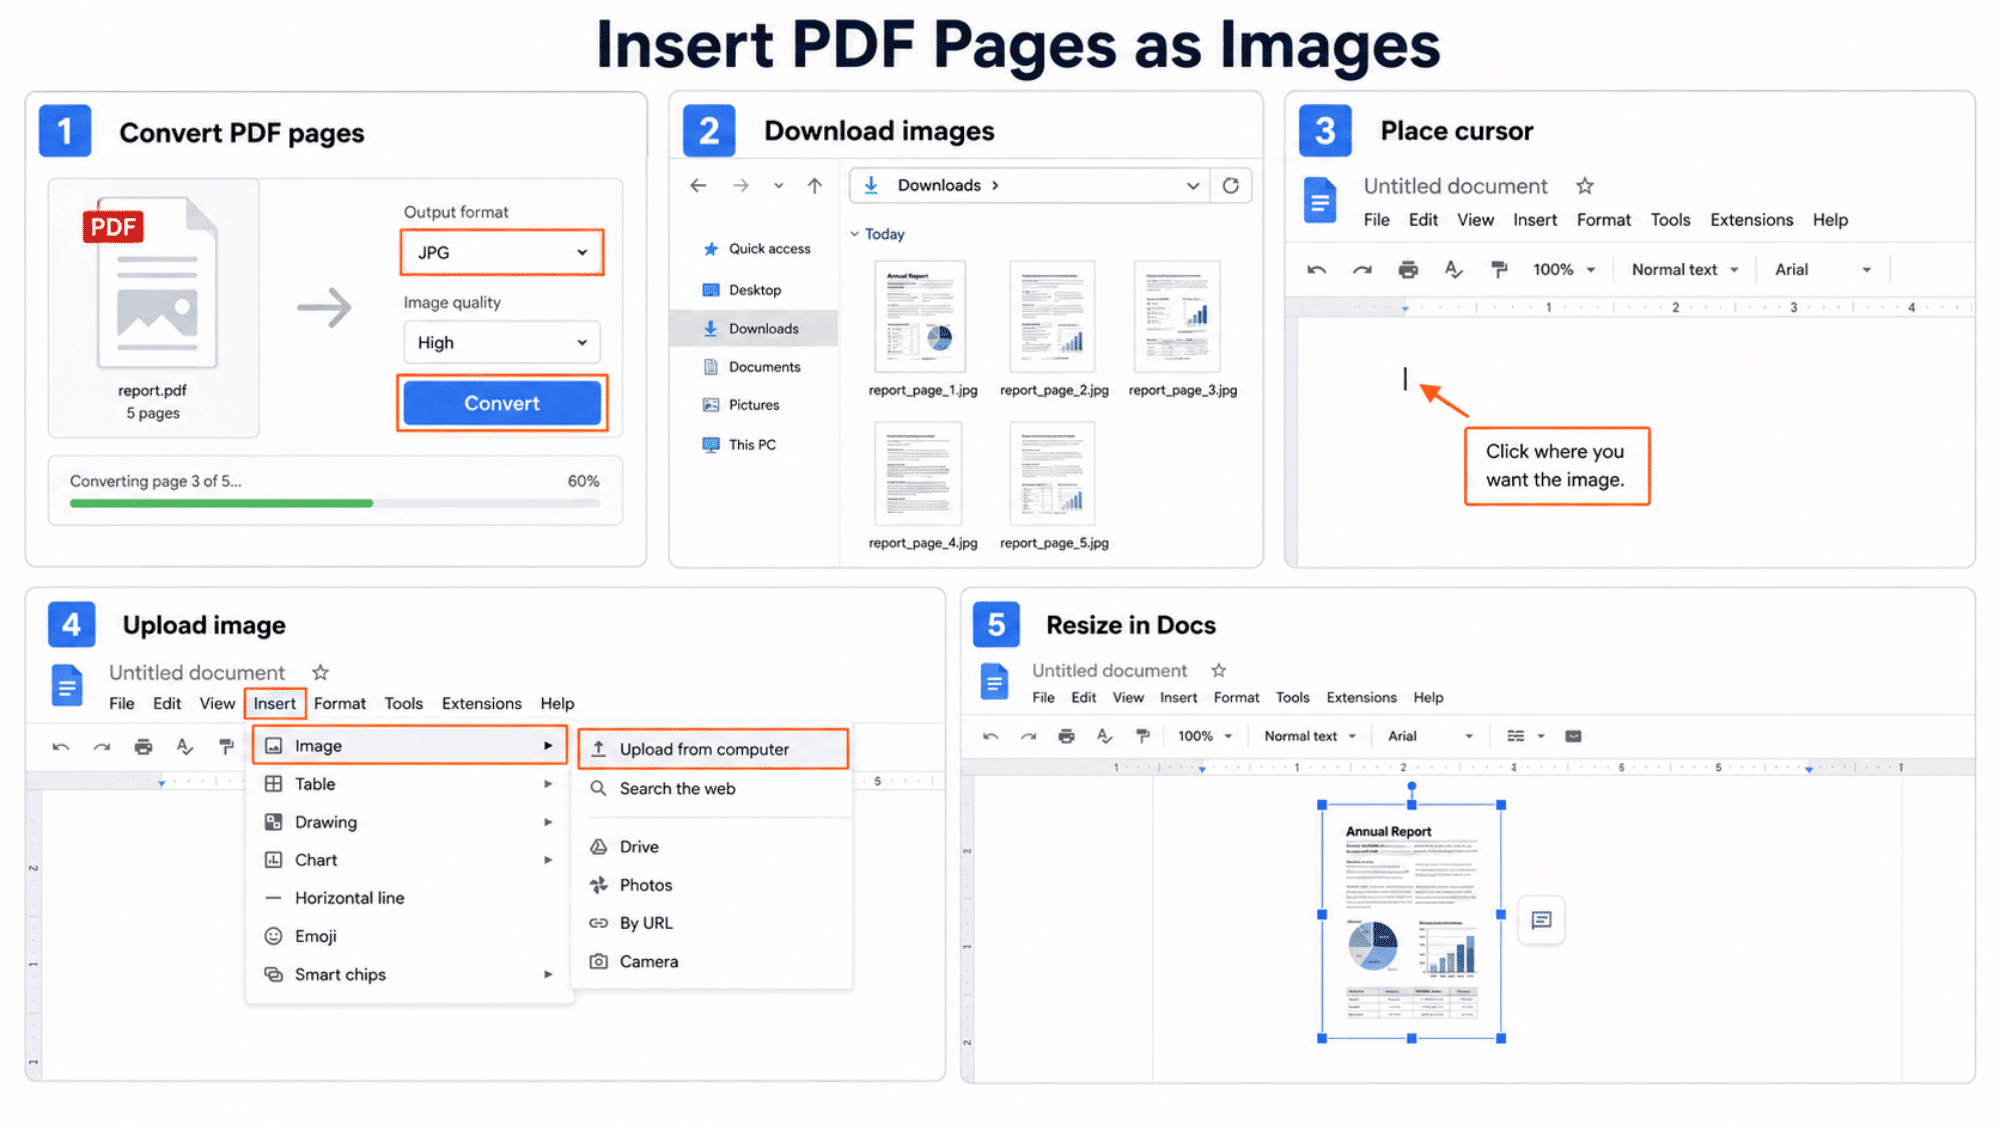
This method preserves the exact visual layout of the PDF. Instead of extracting text, you convert each page into an image file and then insert those images into your Google Doc.
This works well for things like infographics, certificates, flyers, or any PDF where the design matters more than editable text.
- Use a free tool such as iLovePDF or Smallpdf to convert your PDF pages to JPG or PNG files. Both tools are free for basic conversions.
- Download the converted images to your computer.
- Open your Google Doc and place your cursor where the image should appear.
- Go to Insert > Image > Upload from computer and select the image files.
- Resize and reposition each image as needed using the image handles in Docs.
Tip: For a single-page PDF, you can take a screenshot of the page and insert it directly. For multi-page PDFs, convert each page individually and insert it in order.
5. Copy Content From the PDF Into the Document
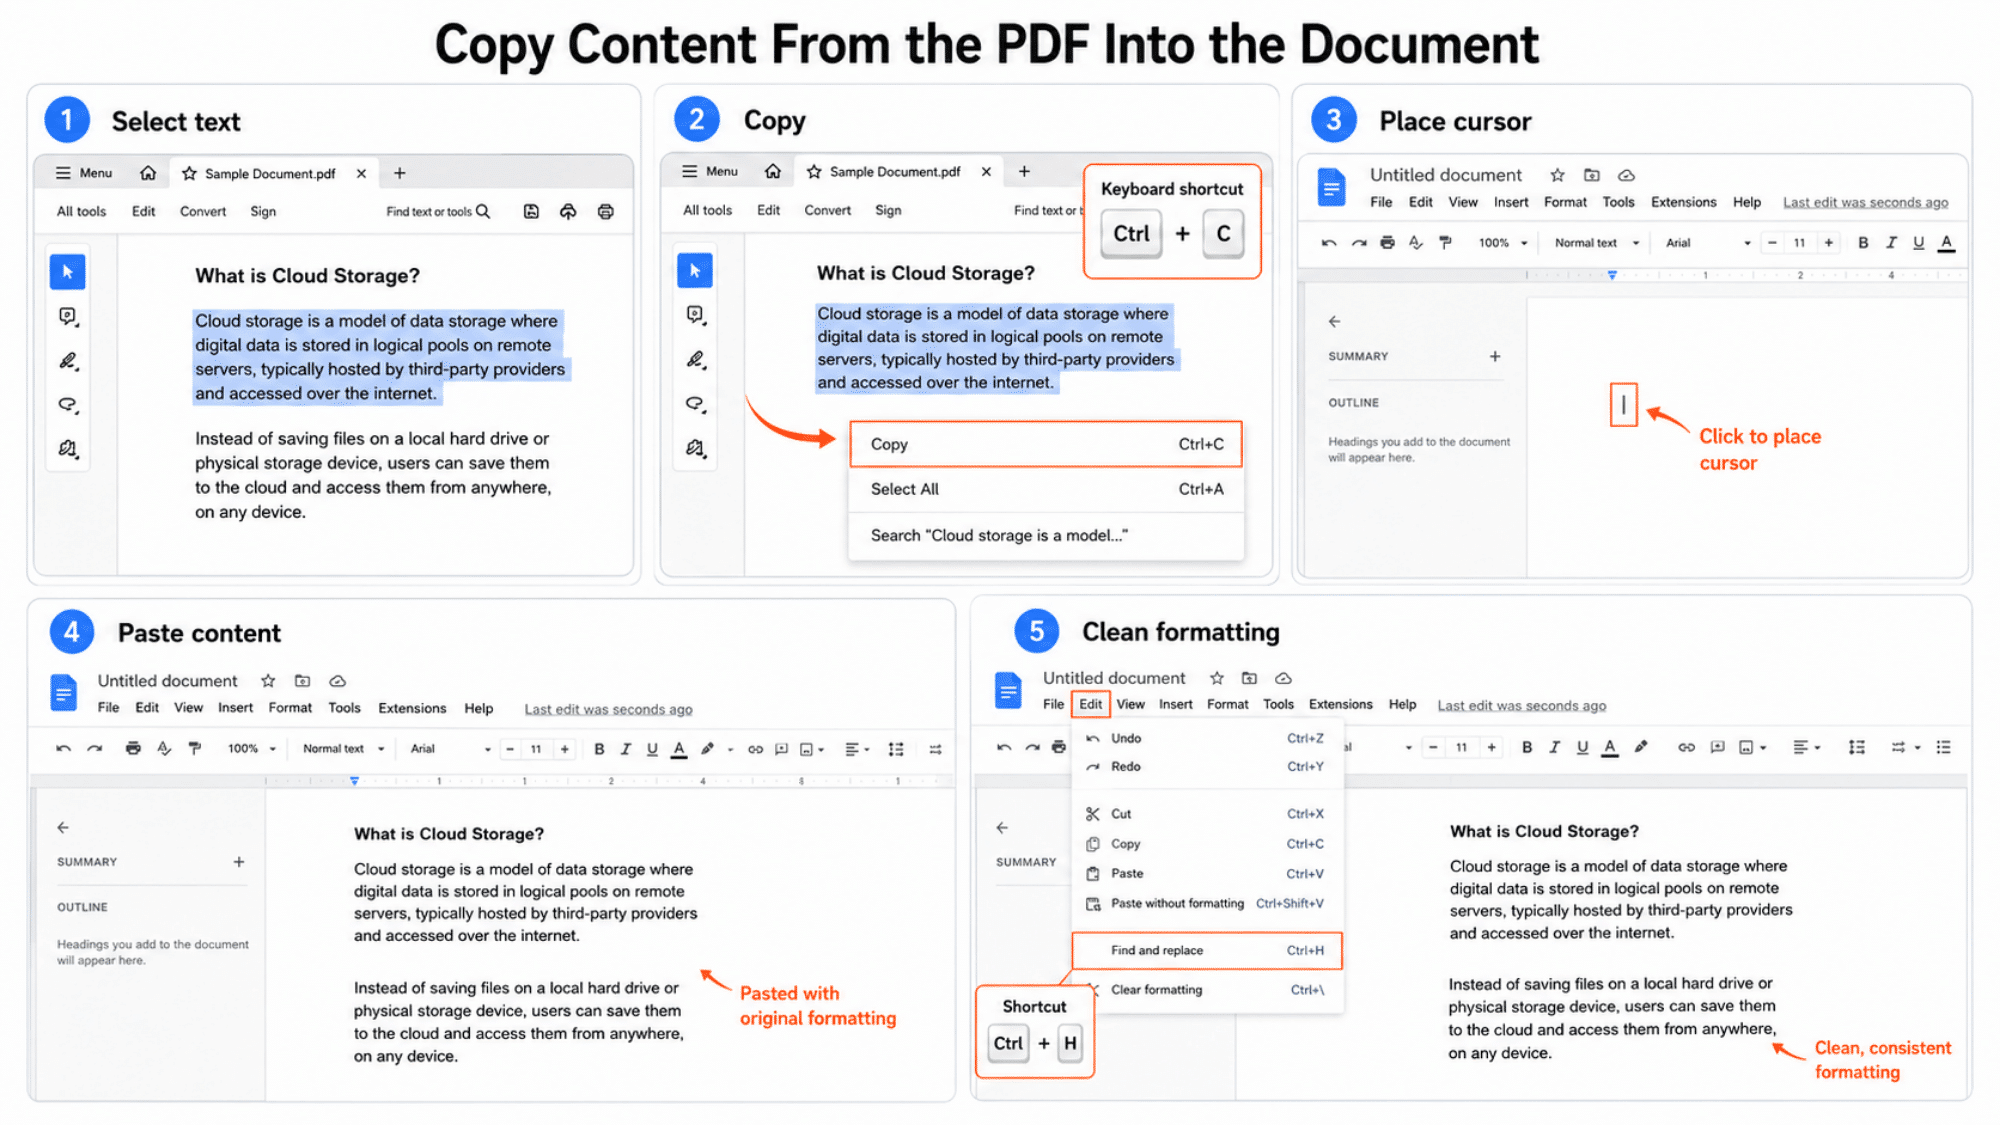
If your PDF is text-selectable, this is the fastest way to pull its content directly into a Google Doc without using Drive.
It works best for shorter PDFs or when you only need specific sections rather than the entire file.
- Open your PDF in any PDF viewer, such as Adobe Acrobat, Chrome’s built-in viewer, or Preview on Mac.
- Click and drag to select the text you want, or press Ctrl+A (or Cmd+A on Mac) to select all text on the page.
- Copy the selected text using Ctrl + C (or Cmd + C on Mac).
- Open your Google Doc, place your cursor at the target location, and paste with Ctrl+V (or Cmd+V on Mac).
- Clean up any formatting issues, such as extra line breaks, misaligned spacing, or dropped punctuation, after pasting.
Tip: To use Find and Replace in Google Docs, press Ctrl + H (or Cmd + H on Mac). This lets you quickly remove repeated characters or fix spacing issues across the entire pasted block in one step.
How to Do This on iPhone, Android, or Mac
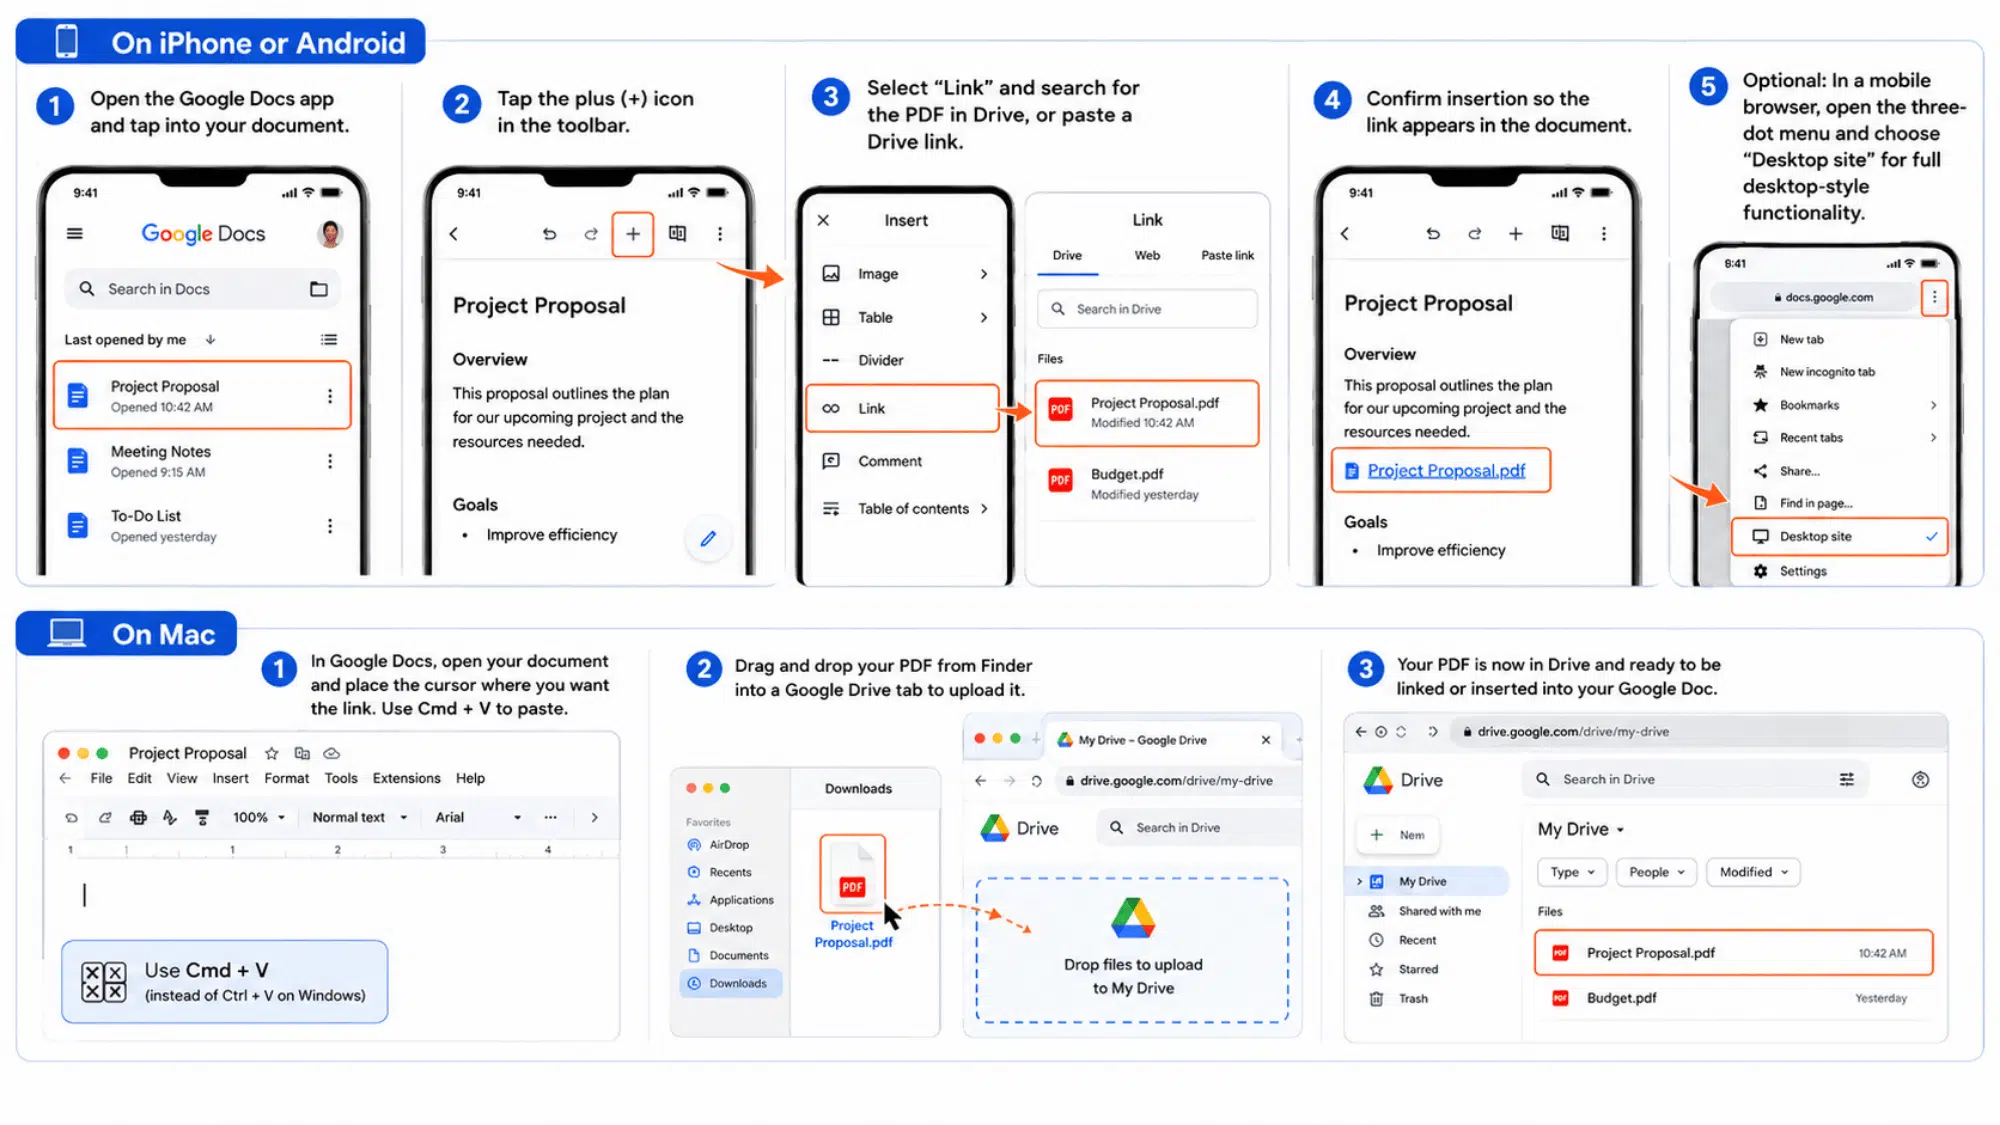
The steps are almost the same across devices, but the upload, sharing, and editing options appear in different places.
On iPhone or Android
The Google Docs mobile app does not support the full Insert menu, but you can still attach a PDF using the smart chip method if the file is already in your Google Drive.
- Open the Google Docs app and tap into your document.
- Tap the + icon in the toolbar.
- Select Link and search for the PDF in your Drive, or paste the Drive link directly.
- Tap to confirm, and the link will be inserted into the document body.
For full smart chip functionality, switch to the desktop version of Google Docs via a browser on your phone. Tap the three-dot menu in Chrome and select “Desktop site.”
On Mac
All five methods above work identically on Mac. The only differences are keyboard shortcuts:
- Use Cmd + V to paste instead of Ctrl + V.
- Upload files to Drive via Finder: drag the PDF from a Finder window directly into the Google Drive browser tab.
Best Methods by Situation
Choose the right approach based on your goal, file type, and how you want readers to interact with your PDF content.
- For a school assignment, include a Drive link or insert PDF pages as images.
- For a work document, add the PDF as a smart chip for quick team access.
- When editing text, open the PDF in Docs, convert it, then adjust formatting carefully.
- To keep the design intact, convert pages to images and insert them to preserve the layout.
- When sharing a signed file, upload to Drive, share the link, and keep the original unchanged.
- For a short quote, copy the needed text, paste it, then clean formatting afterward.
Common Problems and How to Fix Them
Small issues can block access, change layout, or break links. These fixes help you correct them before sharing the document.
- The PDF link is Not Working for Others: Check the sharing settings in Google Drive. The file access must match who you are sharing the Doc with.
- The Smart Chip Shows an Error: The file may not be in your Google Drive. Upload it to Drive first, then try inserting the chip again.
- Text Looks Garbled After Conversion: This usually happens with scanned PDFs. Run the PDF through a dedicated OCR tool before uploading to Drive for cleaner results.
- Images are Blurry After Insertion: Use PNG instead of JPG when converting PDF pages to images. PNG preserves sharpness better at standard screen resolutions.
- PDF Content is Cut off After Conversion: Scroll to the end of the converted Doc. Sometimes the last page or footer content lands below a page break and is easy to miss.
Final Thoughts
There is no single right way to add a PDF to Google Docs. It all depends on what you need the PDF to do once it is in your document. For quick reference, a link or smart chip does the job cleanly.
For editing, the Drive conversion method or a simple copy-paste works well. If the layout needs to remain visually intact, inserting images is your best option.
Most people starting out find the smart chip method the easiest. Try one of these five methods today and see which one fits your workflow.
Have more questions? Comment down below, and we’ll help you out!
Frequently Asked Questions
Does Converting a File Change the Original Version?
No. Google Drive creates a new editable document. The original file stays in Drive unless you delete or move it yourself.
Can Readers Download the Attached File?
Yes, if their Drive access allows it. File owners can limit sharing settings, but download control depends on the file’s permission setup.
How to Add Comments to an Attached File?
You can comment on the surrounding Google Doc text. To comment inside the attached file, open it separately and use its available tools.