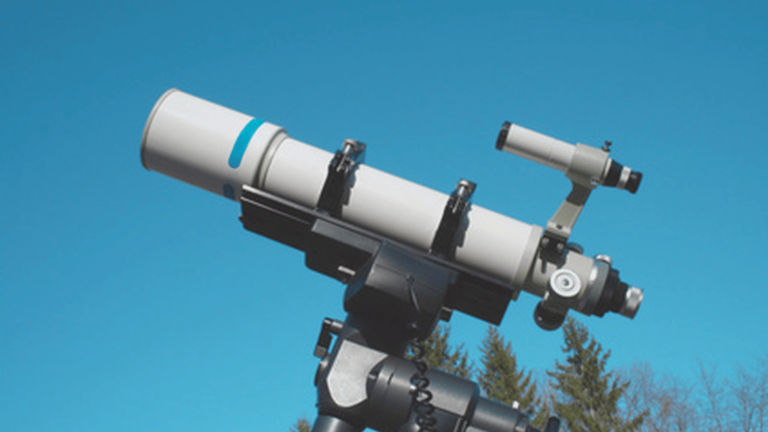


A telescope is an optical instrument that magnifies distant objects, allowing detailed views of stars, planets, and other celestial phenomena.
Choosing the right telescope is important because it directly influences what can be seen and how clear those views will be, making stargazing more enjoyable and rewarding.
This article is written for beginners and explains telescope types, key features, and buying tips in simple terms.
It helps first-time buyers make informed choices confidently, understand technical terms clearly, and select the telescope that best suits their interests and budget.
Key Things to Learn About Telescopes
Telescopes come in three main types: refractor, reflector, and compound. Refractors use lenses to focus light, reflectors use mirrors, and compound telescopes combine both.
Key components to know are aperture (the size of the main lens or mirror), magnification (the degree to which objects appear closer), and the mount (which holds the telescope steady).
Telescopes work by gathering and focusing light from distant objects to create clearer, brighter images. The larger the aperture, the more light it can collect, enhancing the viewing experience.
With these basics, beginners can gain a better understanding of how telescopes function and what to look for when selecting their first one.
How to Choose the Telescope for First-Time Buyers
Buying your first telescope can feel confusing with so many choices out there. The good news is that you only need to focus on a few key points to make the right pick.
1. Aperture Size
The aperture is the most important part of a telescope. It is the diameter of the main lens or mirror that gathers light. The bigger the aperture, the more light it can collect, and the better you will see faint stars, galaxies, and nebulae.
- Small aperture (70–90 mm / 3–3.5 inches): Good for beginners and casual viewing of the Moon and planets.
- Medium aperture (100–150 mm / 4–6 inches): Shows more detail, including Saturn’s rings and Jupiter’s bands.
- Large aperture (200 mm / 8 inches or more): Great for deep sky objects, but heavier and more expensive.
Tip: Start with an aperture that balances good views and easy handling. Too big can be overwhelming for a first telescope.
2. Type of Telescope
There are three main telescope types. Each has strengths and weaknesses, so think about what you want to see and how much care you’re willing to put in.
- Refractor Telescopes: Use lenses to bend light. They are simple, sturdy, and need little upkeep. Great for sharp, clear views of the Moon, planets, and bright stars. They can be more costly per inch of aperture.
- Reflector Telescopes: Use mirrors to collect light. They offer larger apertures at lower cost, making them ideal for faint objects like galaxies and star clusters. However, they need occasional mirror alignment (collimation).
- Compound (Catadioptric) Telescopes: Combine lenses and mirrors. They are compact, portable, and versatile. You can use them for both planets and deep sky objects. They are more expensive but easy to store and carry.
3. Mount Type
A mount keeps your telescope steady. Without a solid mount, even the best optics will shake and blur the view. For beginners, the mount choice is as important as the telescope itself.
- Alt-Azimuth Mount (Alt-Az): Moves up-down and left-right. Very simple to use. Perfect for beginners who just want to point and look.
- Equatorial Mount: Aligned with Earth’s rotation. Lets you track stars smoothly as they move across the sky. More learning curve, but very useful for longer observing sessions.
Tip: A sturdy mount is better than a large, shaky telescope. Always test stability if possible.
4. Budget and Goals
Your first telescope should match both your budget and your goals. Buying the biggest telescope is not always the best choice.
- Budget under $200: Small refractors or tabletop reflectors. Good for the Moon, bright planets, and basic stargazing.
- $200–$500: Mid-size reflectors or small compound telescopes. Great for planets, nebulae, and brighter galaxies.
- Above $500: Larger reflectors or advanced compound telescopes. Best for deep sky viewing and serious hobbyists.
Ask yourself:
- Do I want to mainly look at the Moon and planets?
- Am I more interested in galaxies and faint objects?
- Do I want something light and portable, or bigger with more detail?
5. Ease of Use
Complicated equipment can take the fun out of stargazing, especially for beginners. When buying your first telescope, always think about how easy it will be to handle and store.
- Weight and Size: Pick a telescope you can move without effort. If it’s too heavy, you may not use it often.
- Setup Time: A telescope that sets up quickly keeps you motivated to stargaze more often.
- Portability: If you plan to take your telescope to dark-sky spots, choose one that fits easily in your car or can be carried comfortably.
Tip: The best telescope is the one you’ll use often. Simple and user-friendly is better than complicated and frustrating.
Must-Have Accessories for Beginners
A telescope is just the beginning of stargazing. The right accessories make it easier, more fun, and less frustrating. From aiming at stars to keeping views steady, these tools are must-haves for beginners.
| Accessory | Why It’s Important | Beginner Tip |
|---|---|---|
| Finder Scope / Red Dot Finder | Helps you aim the telescope at stars and planets more easily. | Start with a red dot finder for a simple, point-and-look setup. |
| Extra Eyepieces | Different eyepieces give different magnifications for closer or wider views. | Have at least one low-power and one high-power eyepiece. |
| Barlow Lens | Doubles or triples the magnification of your eyepieces without needing more lenses. | A 2x Barlow is the most useful for beginners. |
| Star Chart / App | Guides you to constellations, planets, and deep sky objects. | Free mobile apps are a quick way to start learning the night sky. |
| Red Flashlight | Lets you read charts and adjust equipment in the dark without losing night vision. | Avoid white light, which ruins dark adaptation. |
| Telescope Mount / Tripod | Keeps your telescope stable for clear, steady views. | Always choose a sturdy mount over a wobbly one. |
| Smartphone Adapter | Lets you attach your phone to take basic photos through the telescope. | Great for sharing Moon or planet shots, but keep expectations simple. |
| Protective Case / Cover | Keeps dust, moisture, and scratches away when not in use. | Store your telescope in a cool, dry place to protect optics. |
How to Set Up and Use a Telescope
Once you have your telescope, a good setup makes all the difference for clear, steady views.
Begin by aligning the finder scope during the day with a distant object, such as a tree or tower, so it matches the main view.
At night, set up in a stable, dark area away from bright city lights and give the telescope time to adjust to outdoor temperatures for sharper images.
Start with a low-magnification eyepiece to make locating objects easier, then switch to higher magnification for more detail, focusing slowly and carefully.
Beginner-friendly targets include the Moon, Jupiter, and Saturn, and you can use a star chart or astronomy app to find other objects.
To keep your telescope in good shape, clean it gently when needed, check for loose parts, and store it in a safe, dry place.
Tips for Buying Your First Telescope
Choosing the right telescope is key to an enjoyable stargazing experience. Beginners should focus on budget, ease of use, and suitable features.
- Buy from reputable online stores or local shops offering expert advice and reliable return policies.
- Avoid cheap plastic telescopes, as they typically offer poor views and can be frustrating to use. Don’t be swayed by very high magnification claims; aperture size impacts image quality more.
- Begin with manual telescopes before considering automated “go-to” models to gain a deeper understanding of the night sky.
- Read reviews and seek recommendations to avoid beginners’ common pitfalls and buyer’s remorse.
- Essential accessories include eyepieces, a stable mount, a finderscope, and a star chart or smartphone app.
Conclusion
Choosing the right telescope involves balancing budget, portability, and intended use to fit individual needs.
Beginners benefit from starting with user-friendly telescope types, such as refractors or reflectors, from trusted brands.
Essential accessories and careful setup enhance the stargazing experience. Avoid common beginner mistakes by researching and purchasing from reputable sources.
With the right equipment and guidance, first-time buyers can confidently find the night sky and discover the wonders of astronomy.